
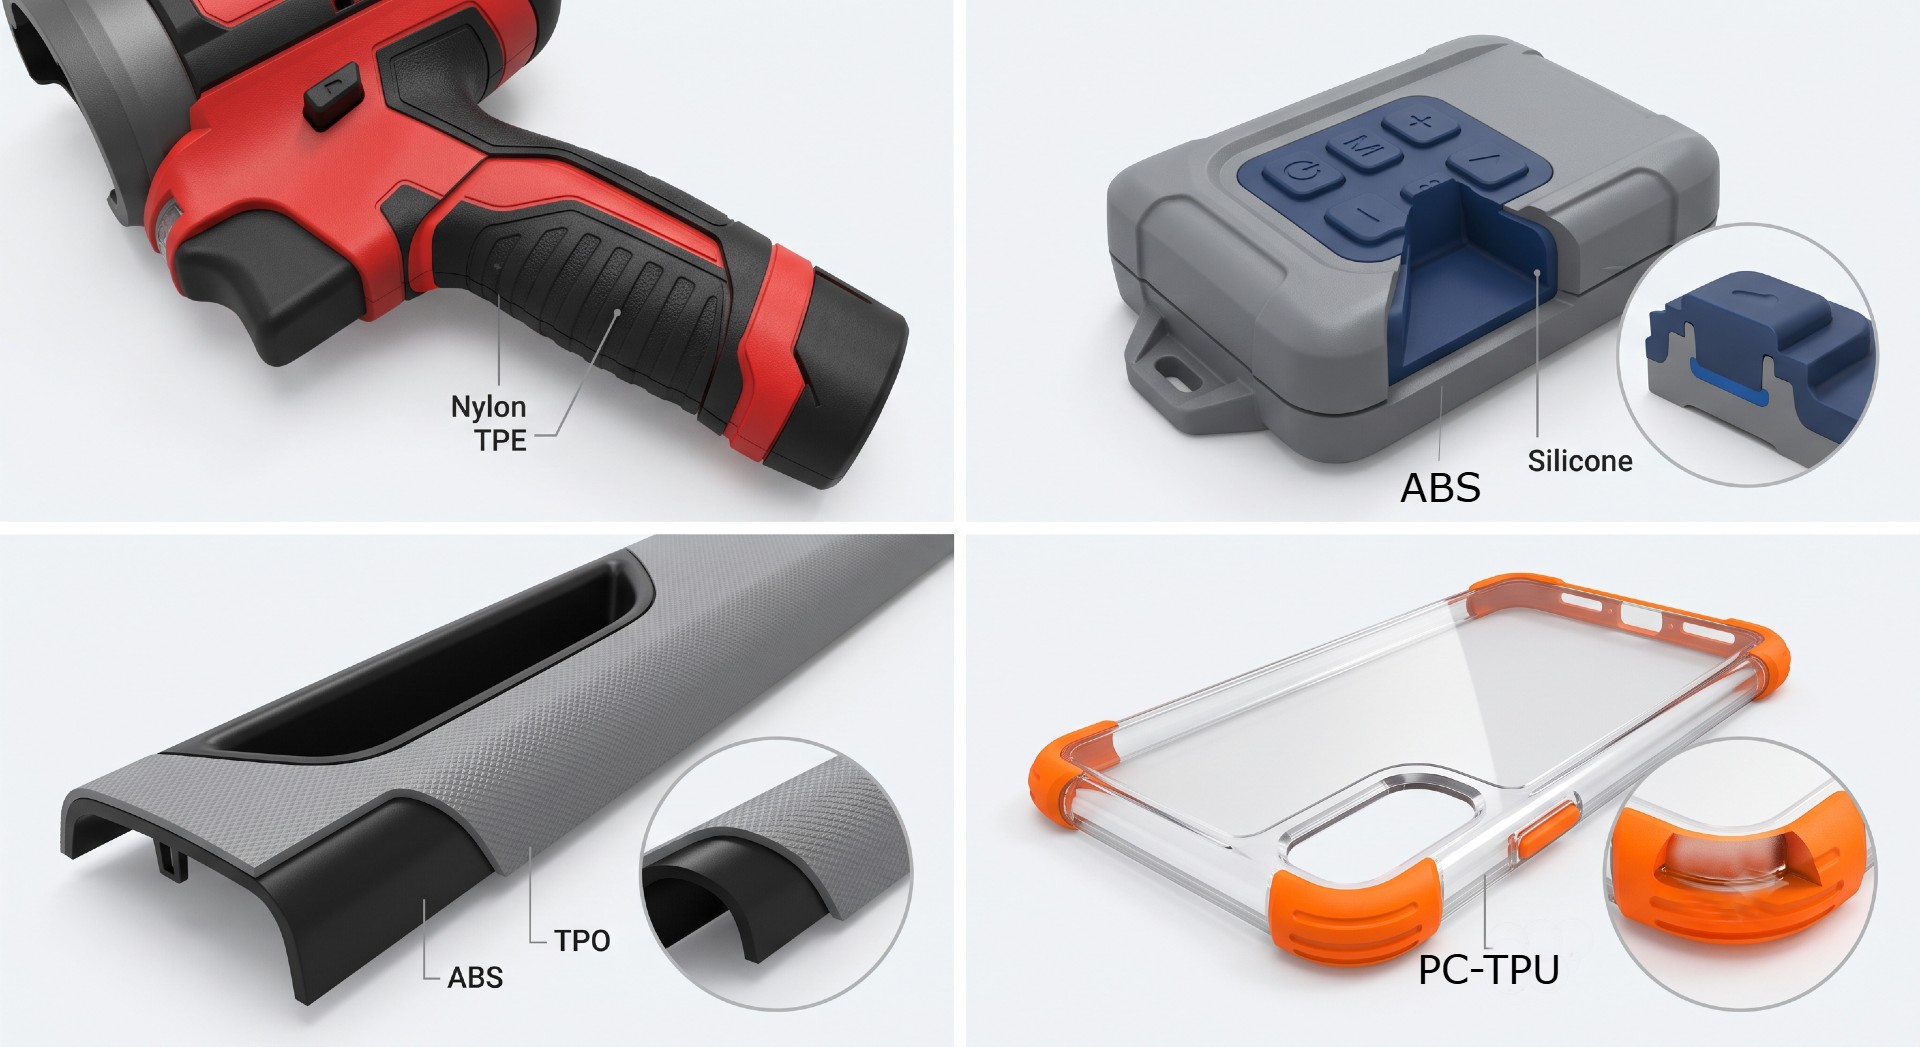
Overmolding is the process of injecting a second material directly over a first, already-molded part. The result is a single component made of two materials, bonded either chemically at the molecular level or mechanically through interlocking geometry. It is used to create soft-touch grips, waterproof seals, vibration-damping bumpers, and integrated metal-to-plastic assemblies without downstream assembly operations.
It is also one of the most over-specified processes in product development. Before touching tooling costs, the first question is not how to overmold. It is whether you need to at all.
First: do you actually need it?
Overmolding requires at minimum two molds, two materials, two sets of process parameters, and a transfer or automation step between them. That is a significant investment. Before committing to it, check whether one of these alternatives solves the same problem more cheaply:
You need metal threads inside a plastic part
Post-mold heat or ultrasonic inserts are almost always cheaper at low to medium volumes. The brass insert is a standard catalogue item. The installation equipment is a one-time cost. You keep a single-cavity tool and full flexibility to change the substrate geometry without scrapping a second mold. Overmolding metal inserts only makes sense when cycle time is the constraint, meaning you are running volumes where the labor cost of post-mold insertion outweighs the tooling investment in a two-shot tool.
You need a soft seal integrated into a rigid part
An overmolded TPE seal sounds elegant. Before specifying it, ask whether a standard O-ring, gasket, or compression seal does the same job. A gasket is a purchased standard component. It costs nothing in tooling, is easy to replace in the field, and can be swapped during design iteration without touching a mold. Overmolded seals win when the seal geometry is complex, when the product is sealed during assembly rather than in use, or when the seal must survive repeated assembly cycles without being dislodged. Outside those conditions, the gasket is the correct answer.
You need two materials in one part for grip or aesthetics
Run the numbers honestly. Two simple single-cavity tools plus a bonding or assembly step often cost less in total than one complex overmolding tool, particularly when volumes are not high enough to justify the cycle time efficiency of two-shot molding. Two parts bonded with structural adhesive, pressed together, or mechanically clipped can achieve the same functional result. The overmolded version looks cleaner in a CAD rendering but that is not an engineering argument.
💡 The honest test
if you can achieve the same functional result with a simpler process, the simpler process is correct. Overmolding earns its place when integration is a genuine functional requirement, not when it looks impressive in a product presentation.
If you do overmold: two-shot vs. transfer
These are two completely different processes with different cost structures, and choosing the wrong one for your volume will hurt you.
Two-shot molding (2K) runs both materials in a single automated cycle on a rotating-platen or core-back tool. The substrate is molded in position one, the platen rotates, and the overmold is shot directly over it in position two without the part ever leaving the machine. It is fast, highly repeatable, and produces a consistently clean bond interface. It is also expensive upfront. The tooling is complex, the press must be a two-component machine, and any design change requires modifying both tool stations simultaneously.
Transfer overmolding molds the substrate in tool one, removes it manually or robotically, places it into tool two, and shoots the second material over it. Slower, more labor-dependent, and more sensitive to substrate temperature and humidity between steps. But the tooling is far simpler and cheaper, the two tools can run on standard single-component presses, and you can change one tool independently of the other.
[Likely] for most low to medium volume products, transfer overmolding is the economically correct starting point. The per-part cycle time penalty is real but at modest volumes it does not outweigh the tooling cost difference. Graduate to two-shot when volumes grow and the labor cost of transfer becomes the dominant cost driver.
Chemical bonding: the polarity rules made usable
True chemical bonding occurs when the incoming molten elastomer has enough thermal energy to slightly soften the surface of the rigid substrate. If the materials are chemically compatible, polymer chains from both materials entangle and fuse as they cool. The bond becomes essentially permanent.
Compatibility is governed by polarity. Polar materials bond to polar materials. Non-polar materials do not bond chemically to polar ones. In practice:
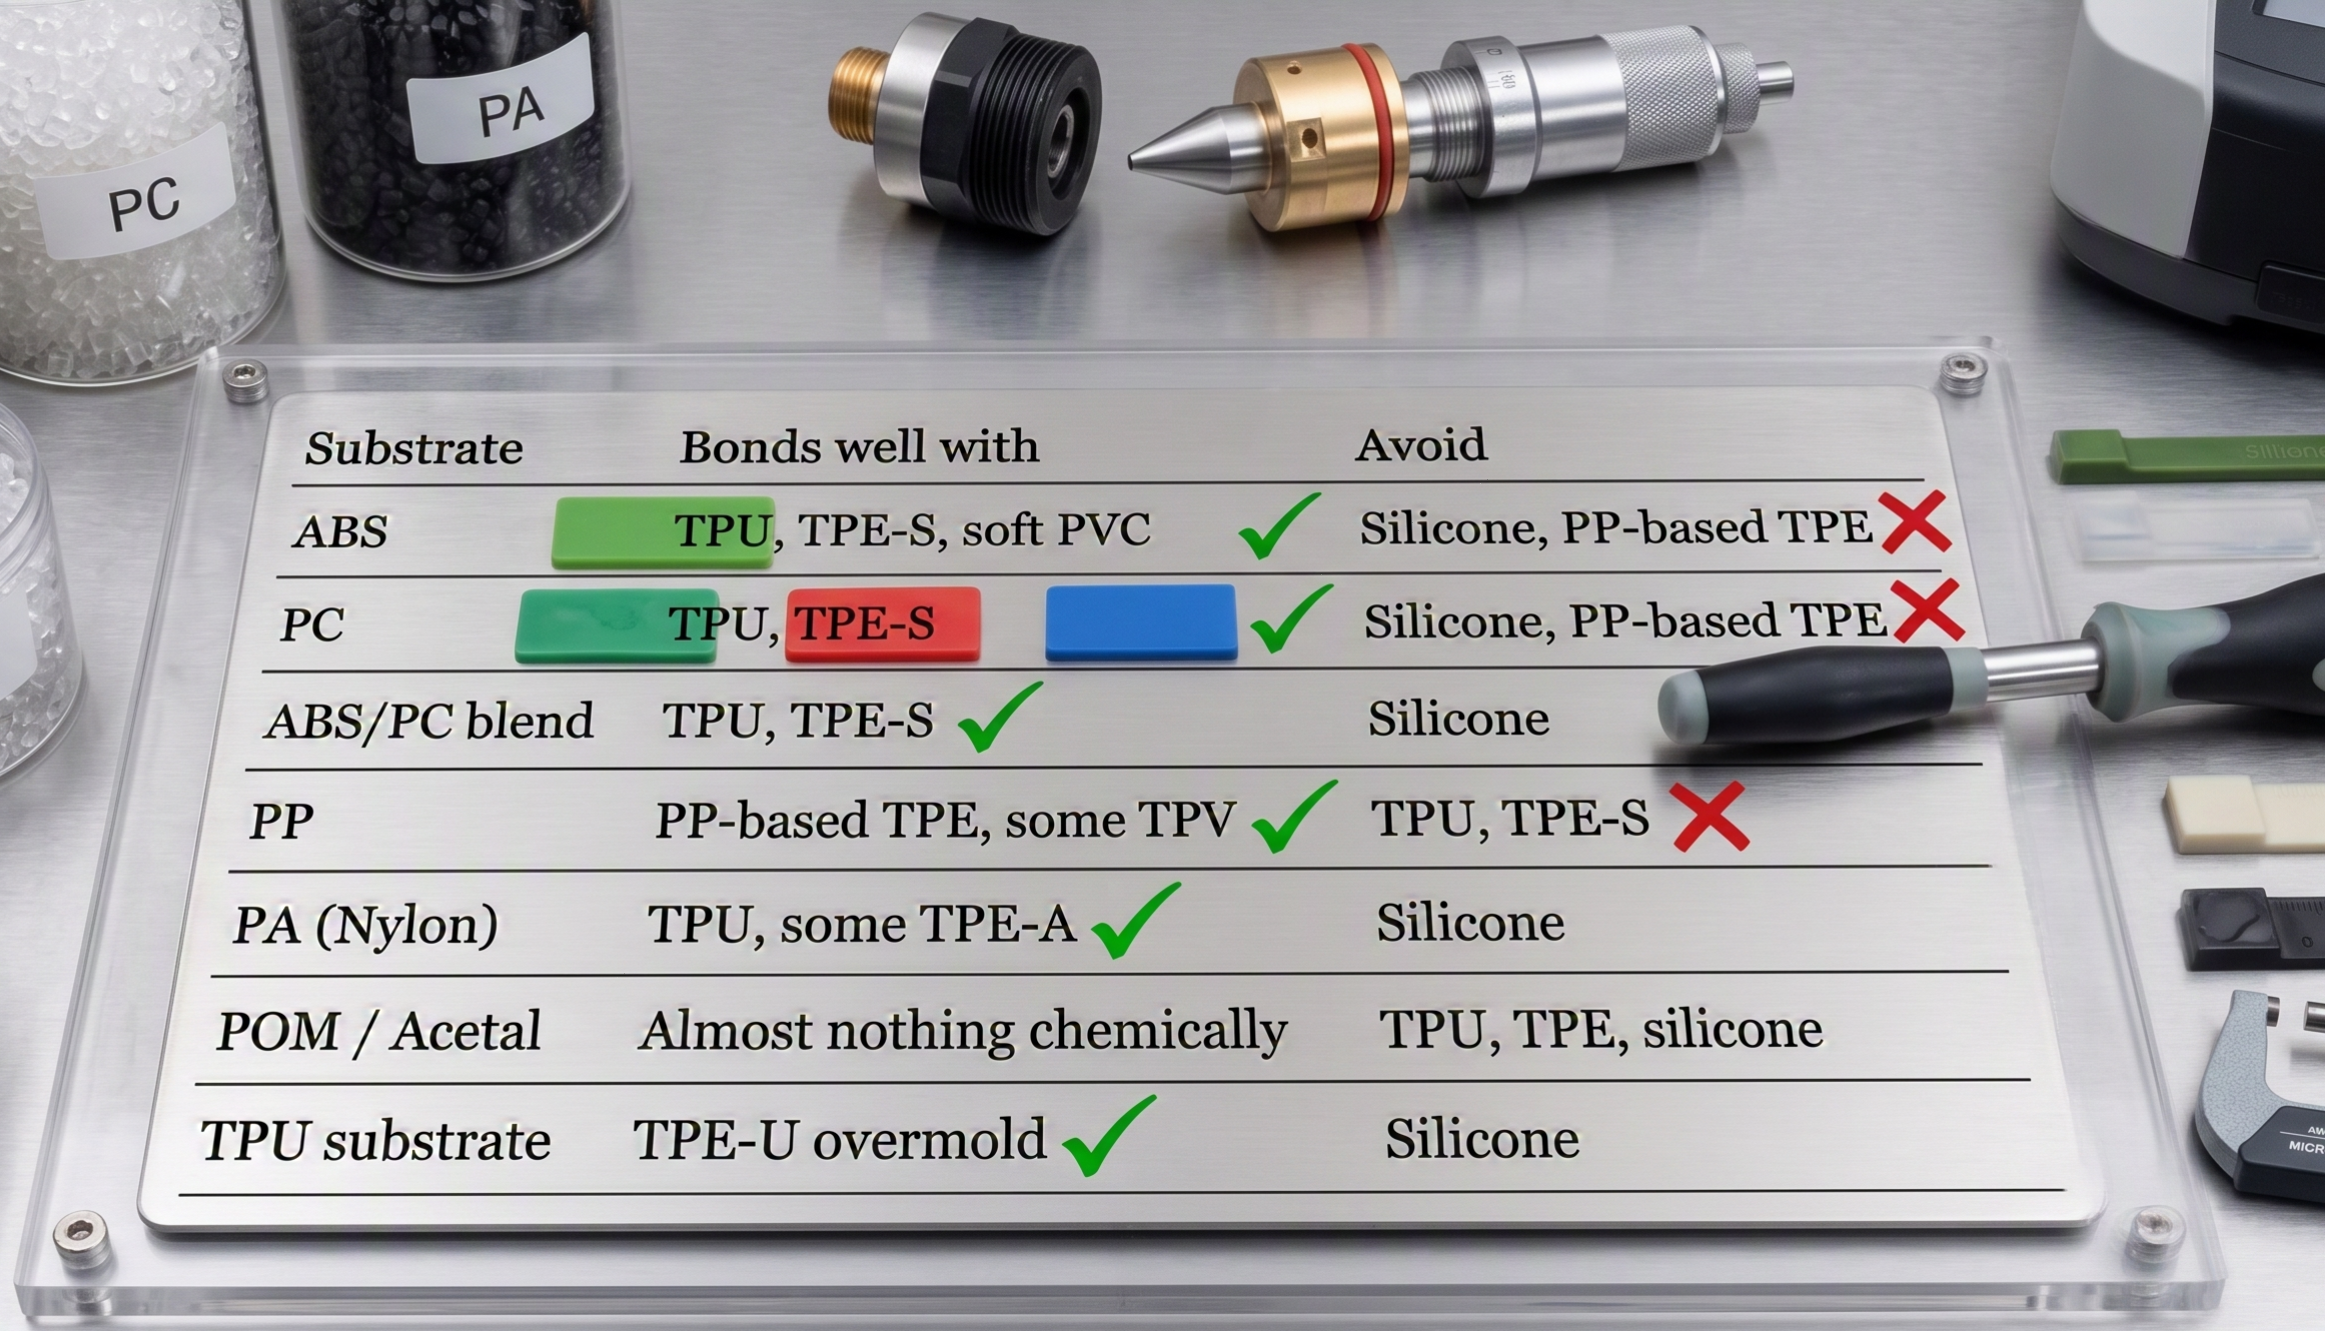
POM is the trap that catches the most engineers. It is chemically inert by design, which is exactly why it is used for precision sliding components. That same inertness means virtually no elastomer will bond to it chemically. If your design requires a soft feature on a POM substrate, you are building a mechanical bond whether you planned to or not.
⚠️ Compatibility Warning
Material compatibility data from your elastomer supplier is more reliable than general rules. Always request bond strength test data for your specific substrate grade, not just the base polymer family. A TPE-S that bonds well to commodity ABS may fail on a flame-retardant ABS grade with different surface energy.
Mechanical bonding: when chemistry is not enough
When material pairs are incompatible, or when you need bond strength higher than chemistry alone can provide, you design the substrate geometry to physically lock the elastomer in place.
Effective mechanical bond features include:
- Through-holes: the elastomer flows through the substrate and encapsulates it from both sides. Simple, reliable, and easy to verify with a cross-section.
- Undercuts and T-slots: the overmold material wraps around a recessed geometry and cannot pull away without tearing. More complex to tool but provides excellent resistance to peel forces.
- Knurled or textured surfaces: increase contact area and create micro-mechanical interlocking. Less reliable than through-holes under sustained peel load but useful for thin overmold sections where through-holes would weaken the substrate.
Mechanical bonding is also useful as a secondary strategy even when chemical bonding is present. On safety-critical or high-peel-load applications, designing mechanical backup into the geometry protects against process variability at the bond interface.
DFM traps that will cost you money
Wall thickness
The overmold layer needs enough thermal mass to develop a proper bond. Too thin and the elastomer freezes before it can soften the substrate surface. Too thick and you get sink marks, voids, and differential shrinkage that stresses the bond during cooling. The practical working range for most TPE or TPU overmolds is 1.5mm minimum and 3.5mm maximum. Below 1.5mm the bond becomes unreliable. Above 4mm you are fighting cooling-induced delamination.
The iteration trap
This is the one that hurts startups the most. The moment you commit to overmolding, you have two tools. Every geometry change to the substrate requires modifying two molds, not one. Every design iteration is now at least twice as expensive in tooling engineering time and lead time. If your product is still iterating on form, fit, or function, this lock-in has a real cost that rarely appears in initial tooling quotes. Consider keeping the two parts separate until the design is frozen, then consolidate into overmolding if the volumes justify it.
💡 A good rule
do not commit to overmolding tooling until you have physically tested a prototype made from bonded or assembled separate parts. If the assembled version passes functional testing, question whether the overmolded version is worth the tooling complexity.
The one question that decides everything
Before specifying overmolding on any part, answer this: is the integration a genuine functional requirement, or is it a convenience that could be solved more cheaply a different way?
If the answer is genuine functional requirement, overmold. Specify transfer tooling unless volumes clearly justify two-shot. Verify material compatibility at the grade level, not the family level. Dry your substrates. Design your wall thickness between 1.5 and 3.5mm. Build mechanical backup geometry into any bond that carries structural load.
If the answer is convenience, assemble two parts until your volumes and design stability make the tooling investment worthwhile. You can always consolidate later. You cannot get back the money spent modifying two tools through three design iterations.